Mouse Trap Mk II

It turned out that the original mouse trap wasn’t sensitive enough. Very small mice just didn’t trigger it. So I decided to improve the design.

The case of the trap is clear, so I thought I could have a beam of light going from one side to the other. When the mouse broke the beam, it would trigger a solenoid that would close the door. After some thought, I decided to use a white LED and LDR (so no lasers or signal modulation). The LED was quite bright (even though it was only driven by 5mA) but bright lights don’t seem to put the mice off. The LED illuminated the LDR much more than ambient light (except in bright sunlight - but that’s not the best conditions to catch mice, and even if it did need to work in sunlight the case could be covered to reduce the ambient light falling on the LDR).
Mouse Trap Mk I

So we thought we might have a mouse under the kitchen units…

This isn’t the first time we’ve had mice. And if you don’t think there are any in your house, well maybe it’s because you haven’t noticed them. They are very elusive, generally coming out in the middle of the night, and they are very shy!

I already had all the bits I needed to catch and re-home the mouse (you have to take it quite a long way - a mile or two - otherwise it will find it’s way back!). The central component is a humane mouse trap, which has a pressure sensitive pad and door that stops the mouse escaping. They typically cost about £10 (e.g. on Amazon). My advice - do a bit of research - don’t just get the cheapest one. They are very sensitive, but mice are very light, so the one I have had to be adjusted by putting a couple of coins on the pressure pad so that even the lightest mouse would trigger it.

Home Assistant Serial Link to an Arduino

The purpose of this project was to connect an Arduino Nano to the USB port that Home Assistant was running on. For me that is a Raspberry Pi 4 but this solution should work with any Home Assistant hardware. And the reason for using a serial connection over USB (rather than wirelessly with WiFi or similar) could be for many reasons:

  • Wifi may not be available (e.g. if the network is down)
  • It is more secure
  • It is un-jammable

The ultimate plan for me was to create an uninterruptable power supply for Home Assistant from bits that I had:

Camera Object Detection in Python, Part 1

I have been looking at TensorFlow and following some of the tutorials. I have a camera that looks out over the front garden using a Raspberry Pi 3. It’s has quite a low resolution and frame rate (deliberately so that it doesn’t use a lot of network bandwidth). The resolution is 640x480 at 3 fps. Usually there is not much going on (which is good) but when something does happen I always thought it would be good to have some automatic processing, and TensorFlow seemed like a great way to do that. I followed one of the [tutorials on a single frame][TensorFlow Object Detection], and it picked out quite a lot of detail, as shown below:

Home Assistant REST Devices and Sensors

A while back (before I was using Home Assistant) I built a COB light controller board. The idea was to have lights under the eaves all round the outside of our house (bungalow). They look like this:

COB Lights under Eaves

In this picture there are three lights, but around the rest of the house there are about 15 in total on 4 different circuits. I won’t go into the detail here other than to say that there is a controller board up in the loft that uses a Wemos D1 mini which serves up a REST interface to turn the lights on and off. I did a presentation for the London Raspberry Pi group. The link to my GitHub page is here:

Home Assistant on the Raspberry Pi

I use Home Assistant (HASS) around the house to switch some of the lights on and off automatically and to monitor the temperature. I plan to use HASS for other automation tasks, maybe controlling things in the garden (e.g. watering plants in the greenhouse) and inside to turn the heating on and off. In this post will describe what I currently have and some ideas for the future.

The main reason that I like HASS is that it separates functionality, specifically keeping the configuration and control logic away from the sensors and devices. This makes everything much more scalable and maintainable. I could write the software to control everything, but like most software engineers I would rather not reinvent the wheel, especially when you have something like HASS that does such a good job with much less effort.

NRF24L01 on Raspberry Pi

OK, so just for the record, I’ve tried using the NRF24L01 on the Raspberry Pi (via tha GPIO SPI pins) and I don’t recommend it.

So the following is just a record of what I did, in case I ever change my mind :).

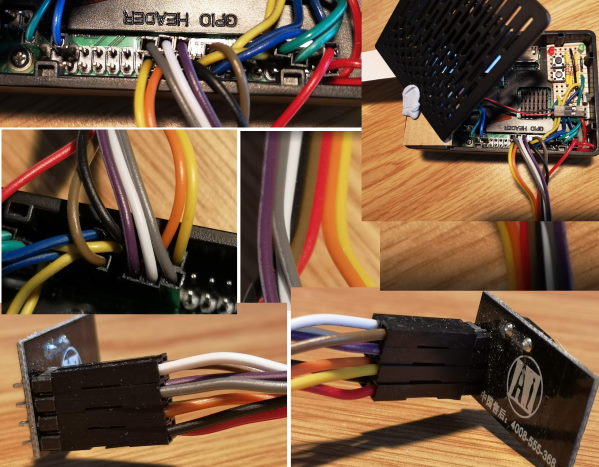
RPI NRF Board Wiring

NRF24L01 Side  Wire   Raspberry Pi Side
-------------  ----   -----------------
MISO           White   GPIO  9 (SPI_MISO)
SCK            Grey    GPIO 11 (SPI_SCLK)
CE             Orange  GPIO 25
GND            Black   GND     (PIN 20)
IRQ            Brown   GPIO 22
MOSI           Purple  GPIO 10 (SPI_MOSI)
CSN            Yellow  GPIO  8 (SPI_CE0)
VCC            Red     3.3V    (PIN 1)

The Raspberry Pi code consisted of two python files which had to be in the same folder:

Dotnet Core on Raspberry Pi

Source Code on GitHub

Next: [Creating the solution in Visual Studio Code…][RPI-dotnet-software]

This week’s project has been writing the software for my GPIO board on my Raspberry Pi. I added this board to a case I bought for my Raspberry Pi 3+. I designed the GPIO board with a few things in mind:

  • I wanted a couple of buttons so I could do things like shutting the Pi down (it’s not a good idea to just unplug the power)
  • I wanted a couple of LEDs so I could display a simple status
  • I wanted to control the fan so it wasn’t on all the time, just when it was needed (like a laptop fan)
  • The piezo sounder was added because there was space - so maybe I’d be able to get the Pi to do audible notifications

[This was mainly for when I was running the Raspberry Pi headless - so there wouldn’t be a screen or keyboard connected.]